Soda Can Jewelry

You only get 10 cents for turning in a soda can at the recycling center – why not turn your soda cans into jewelry instead? Here are some ideas I found out on the Internet, collected from some of my favorite bloggers.

Re-Imagined Waste


Rolled Beads

Upcycling: Re-imagining Our Waste has a fantastic tutorial on making very wearable Soda Can Jewelry.


Pop Tab Purse

Check out this HubPage on how to make a Pop Tab Purse! Wow! Seriously, wow!


Pop Tab Bracelet

Instructables has the Pop Tab Bracelet tutorial.

Pop Tab Bracelets


Soda Can “Tiles” Bracelet

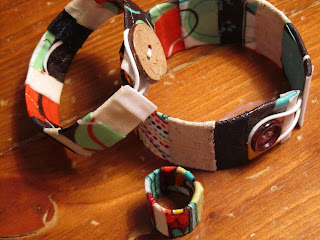
made by Twelve Crafts Till Christmas

This tutorial tells you how to make these tiles, however I would use elastic in place of the fabric so that I wouldn’t have to bother with the button. Plus, I think it would look better without the button. Note to bleeding finger: the Modge Podge is a step you don’t want to skip. It coats the sharp edges of the soda can so that your jewelry is safe to wear.


Soda Can Earrings

made by Shona at The Artistic Life

Shona’s earring tutorial.

That’s it for now. Check back later as I’m sure I’ll add more tutes to this page as I come across them or as I develop them myself.

Cassette Tape Bracelet

This is an ingenious way to upcycle a cassette tape. I was going to say “old cassette tape” but really, that’s redundant, isn’t it?

The instructions are lost in the ethernet of Google but the basic idea shouldn’t be hard to figure out. Here’s how I would do it. Pull the tape out of 2 cassettes, but don’t discard it. I’ll post some tutorials on how to upcycle the tape from the cassette.

Boil some water and with a pair of tongs dip one of the cassettes into the water until it is soft enough to be manipulated. Wearing a pair of gloves to protect your hands from the heat, carefully bend the cassette around a soup can, or a can of beans, whatever you have on hand. You may have to hold the cassette around the can until it cools enough to hold its new shape. Repeat with the second cassette. Now you have your two bracelet pieces. Now how to attach the two pieces together on one side and the zipper on the other side? It doesn’t look as if this is how the bracelet in the picture was made but I think making a fabric cuff with a zipper that would fit inside the cassette cuff and then glue the cassette to the fabric should do the trick. Or you could use elastic instead of fabric to line the bracelet and skip the zipper altogether, although I think the zipper adds a nice touch.

The pic shows a black cassette which looks very biker chic, but if you used a white cassette it could have a retro-60’s feel or skip the 60’s reference altogether and just call it contemporary.


Book Shelves Gone Wild

My friend G and I were wandering around The Lab (it’s an industrial chic outdoor mall) after lunch at The Gypsy Den and ended up in this little clothing store “Gloss” that had the most creative displays. Take a look at their books made into shelves that double as jewelry organizers.

Here’s how to construct a floating book shelf:

Invisible Bookshelf

from WebUrbanist


Dollhouse Bookcase

This is a dollhouse made from an Ikea bookcase. It’s a fantastic way to salvage a bookshelf that you may not have a use for anymore or which is marred in some way that makes it unsightly as a bookcase. I found this pic while traipsing through Grosgrain Fabulous. It’s worthwhile to click on over there and read her comments and thoughts regarding this dollhouse.

20 Unusually Brilliant Book Shelves

WebUrbanist has put together some wild book shelves which lend themselves to the DIYer with access to a glue gun and a hammer.

Bookshelves Made of Books

And check out these book cases made from books. I’ll call them Cannibal Cases.

Bookcases Made of Books


Check out this hanging book case made of – wait for it – HANGERS! You’ll need to incorporate some plier action into your skill set, but it shouldn’t be too difficult. I think this is my favorite simply because it’s so hard to find ways to reuse dry cleaner hangers.

Creative Hanging Bookshelves


Funky Bookcase

I think this one is made from pallets.


If you have a lot of cardboard boxes around, decoupage them (for beauty and strength). Stack them how you like them and secure with 2 straps. This contraption won’t survive an earthquake or a pair of toddlers, but it could work nicely as a room divider.

Elegant Bookcase

And this is just for fun. It doesn’t necessarily use recycled materials but it’s too much fun to not pass on to you all. Oh the possibilities!

created at: 10/20/2010


Black Cable Knit Crop Top

"Blah" sweater just minutes before being decollared.

I have had this little black sweater in my closet for years. I keep it there because I need little black sweaters that I can throw on over a dress or a tank top and jeans. The thing is that I never pick this sweater. There isn’t really anything wrong with it, it’s just kind of blah. So after years of folding and refolding the same sweater over and over I decided it’s time to move it to the refashion drawing board. My refashion drawing board is really my dress form. When I have no idea what I want to do with something I put it on my dress form and stare at it for awhile. If I still have no good ideas then I leave it there and I look at it from time to time throughout the day and generally by the end of the day I’ve come up with something.

This refashion went in stages though. First I pinned the collar under and the ribbing up under the chestal area to try to get an idea of how my idea to turn this into a crew neck cropped sweater would look.

crop it in the front


leave it long in the back

First step is to take off the collar. I started with a seam ripper but gave that up after two minutes. I’m not very patient with seam ripping. I generally only like to do it when I’m watching a television show, otherwise I just don’t have the patience.  So I took my sweater over to the sewing machine and did a tight zig-zag stitch just inside the line where I wanted to cut the collar off, then I cut the collar off. I was a little afraid to cut the bottom of the sweater before I was sure I had the line right so I sewed a looser zig-zag stitch right along the edge of the ribbing so that the zig-zag caught both the edge of the ribbing and the edge of the sweater just under the chestal region.

juncture where new ribbing seam tapers out to the back of the sweater


Once I tried the sweater on and was sure I like the line of the crop I turned the sweater inside out and carefully cut away the excess portion of the sweater so that the bottom of the sweater could lay flat. Done! Or so I thought. After putting the sweater away I decided that I didn’t like the button or the little v-shaped opening at the top of the sweater so away they went. Done! Not so fast! It’s still a pretty blah-looking sweater. I dug through my drawer of weird and wonderful closures and found these beautiful ivory-colored crocheted frog closures. Perfect!

two frogs ...


three frogs ...


five frogs - Done! No really. It's done.

I sewed snaps to the sweater and onto the back of each toggle so that I could remove them before washing.  And BONUS – if I come across some other toggles that would work with this sweater I can interchange them.