About Kat

I started this blog to share with you all the results of years of turning trash into treasures. Hopefully I'll spark some new creative thoughts and if that happens I hope that you'll share your discoveries and together we’ll build a blog that will singlehandedly reduce global warming and save the world! Okay, maybe that’s a grand goal but we should be able to at least downsize our own trash output.

No Need To Trash Your Treads

I started this article as a full on bicycle recycle post but quickly realized that if I wanted to talk about recycling the aluminum and other metals used as bicycle parts that would have to be a whole ‘nother post. So today we’re just going to explore how to recycle or reuse a blown inner tube.

Next time your bicycle inner tube is trashed beyond repair don’t toss it in the trash. A damaged inner tube can be recycled in a number of ways around the house, to make a fashion statement or put back to use on your bike.

Inner Tube Belt

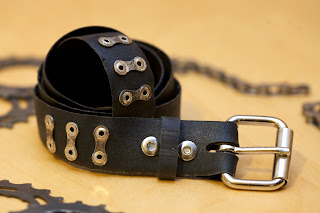
www.rebicyclist.com/

If you’d like to try your hand at making a bicycle tire belt check out this tutorial at Open Design Club.

Bicycle Tire Cuff

Bike Tire Cuff - upcycled bicycle tire - medium - FREE SHIPPING

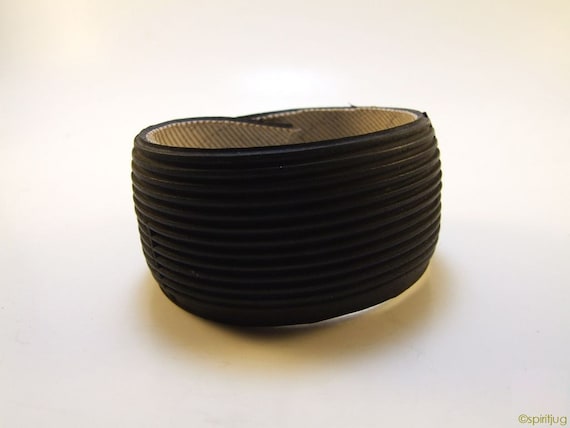
www.etsy.com/listing/92635987/bike-tire-cuff-upcycled-bicycle-tire


Bicycle Tube Leaf Earrings

bicycle tube leaf earring

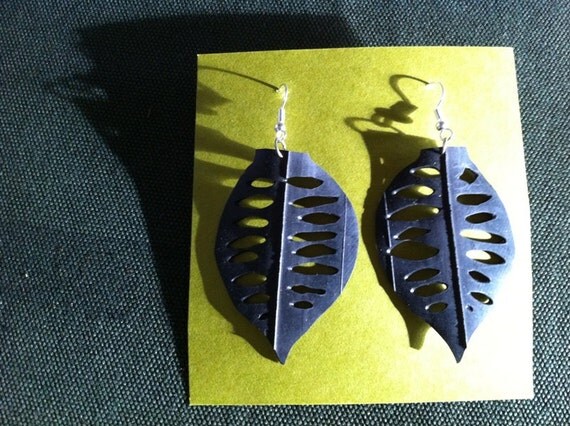
www.etsy.com/listing/87528271/bicycle-tube-leaf-earring


Rubber Ties

Tire tubes can be used to fasten a milk crate or other basket to the rack on your bike. You can cut them across so that you have a long tie and then cut them into thinner strips is you like. Since the rubber is stretchy and pliable but not slippery it holds a knot quite well.

You could use this same idea to tie down a tarp or in other places where you might have used a bungee cord. You could even make your own bungee cord by punching a hole in each end of a length of inner tube, insert an S-hook or snap-hook and you’ve got your bungee cord.

Bicycle Chain Stay Protector

Those of you who ride a lot know that one annoying feature of the chain and sprocket transmission is the chain slapping on the chain stay. Besides being an irritating noise this also wreaks havoc on your paint job. An easy solution is to save the tube from your next flat. If it has a small hole in it, patch it up and use it for later, of course; but if the hole is too big to patch you can recycle it as a as a chain stay protector.

Cut the tube into a piece the length of your bike’s chain stay and split it up the middle length-wise. Clean the tube with solvent and rub with sandpaper to make it easier for the glue to adhere. Wrap the chain stay with the tube, making sure to cover it all the way to the dropout. Stretch the tube around and glue it into place by placing a bead of glue on the outside of the tube and rolling the other side of the tube over the glued portion. This will work best if the seam is on top of the chain stay facing either in or out. Tip: before gluing attach the inside part of the tube with a bit of tape to make it easier to stretch the tube tight. The tube will cover the tape once it’s glued in place.

Bicycle Storage

A piece of tire can be used to hang your bike from a ceiling. Measure the distance between your seat and your handle bars. Nail two tubes to the ceiling according to your measurements.

Emergency Sidewall Repair

If you get a tear in the sidewall of your bicycle tire, your tube might be beyond patching as well. This isn’t a permanent solution but you can save your ride by cutting the punctured tube into a piece large enough to patch the sidewall. Glue the piece of tube over the hole on the inside of the tire. If you’re not carrying glue, place the patch over the hole and let the new tube press it in place. In the case of a very big hole use several layers of inner tube. Now carefully ride to your destination or to a repair shop.


Draft Dodger

Seal a drafty window or door with a length of inner tube cut to fit.

Protective Pads

Cut the inner tube into the size you need to protect things from bumping each other. Cut small custom-sized pieces to place between your bike and an item you’re clamping to it to keep from scratching the paint.

Cut once across the tire so that it is a long tube. Run a chain through the tube to keep the chain from bumping and scratching other items.

Rubber Bands

You don’t often find a need for a giant rubber band very often, but when you do an old inner tube can be quite handy. Just slice the tube into rubber bands of the thickness you desire, keeping in mind that the thicker the band the less stretch it will have.

Sandals

Check out Hollow Tops tutorial for making your own sandals from tires.

www.hollowtop.com/sandals.htm

Wow! I never knew until I started researching this article just how many ways an inner tube can be used. I can’t wait until my next flat tire!

“Golden Girls” T-shirt Gets Glammed Up

love the pattern on the fabric

the fit - not so much


I picked this Golden Girls style t-shirt up at a garage sale for – you guessed it – $1! I figured that if I couldn’t turn it into a wearable top that it would make a great skirt. The fabric is super soft but very thick so perfect for a skirt. Once I tried it on though I really liked how it looked with my skin tone so I was determined to turn it into a top. I played around with it quite a bit and even considered making it into a halter but the fabric was so thick that when the weather was hot enough for a halter top I would be sweating it out in this top. Back to the drawing board – or in my case – the dress form.

This beaded collar has got to go!


First step – cut away the collar band. Now the top falls off me! I like an off-shoulder top but this one would fall to my knees if I let it. I made a casing by folding 3/4 of an inch of the neckline to the inside and stitched it down, leaving two small holes for inserting elastic. One hole was at my left shoulder and the other hole was a couple of inches to the left of the front center. I’m going to gather just a small portion of the neckline at the front left of the top. I inserted my elastic and tried it on before stitching the elastic into the casing.

A note about the elastic I used for this shirt. I cut strips from a pair of pantyhose that had a run and used these strips for my elastic.

Next step – cut a u-shape at the bottom of the shirt with the bottom of the U at the front and back center of the shirt. I also inserted some of my pantyhose elastic into the hem of the sleeves to gather them slightly.

Now with the elastic at the top, the slightly off-shoulder neckline and the u-shaped bottom I like how this new top looks on me. I also like that it’s a heavier fabric now that the weather here in sunny southern California is a bit cool.

love the new neckline


The rounded hemline gives it a nice drape.

Give me a nice Golden Girls top any day!


Holey Lace All Darned Up

I picked up this beautiful flowy cardigan with a gorgeous lace back for only $6 on clearance. Only problem was there were a few gaping holes in the lace. Should be an easy fix right? Six bucks isn’t that much of a gamble, so I handed over my dollars and headed home with my new top.

I’m posting this to show you that without much in the needle skills department you can save something that you might have thought was ruined.


one of the bigger holes

I threaded up a needle with white thread and got to work.

Can you see my needlework?


here's a large area that's been mended

I’m very happy with the end result. You can’t tell at all that 30 minutes ago this was a holey mess.


Soda Can Jewelry

You only get 10 cents for turning in a soda can at the recycling center – why not turn your soda cans into jewelry instead? Here are some ideas I found out on the Internet, collected from some of my favorite bloggers.

Re-Imagined Waste


Rolled Beads

Upcycling: Re-imagining Our Waste has a fantastic tutorial on making very wearable Soda Can Jewelry.


Pop Tab Purse

Check out this HubPage on how to make a Pop Tab Purse! Wow! Seriously, wow!


Pop Tab Bracelet

Instructables has the Pop Tab Bracelet tutorial.

Pop Tab Bracelets


Soda Can “Tiles” Bracelet

made by Twelve Crafts Till Christmas

This tutorial tells you how to make these tiles, however I would use elastic in place of the fabric so that I wouldn’t have to bother with the button. Plus, I think it would look better without the button. Note to bleeding finger: the Modge Podge is a step you don’t want to skip. It coats the sharp edges of the soda can so that your jewelry is safe to wear.


Soda Can Earrings

made by Shona at The Artistic Life

Shona’s earring tutorial.

That’s it for now. Check back later as I’m sure I’ll add more tutes to this page as I come across them or as I develop them myself.