About Kat

I started this blog to share with you all the results of years of turning trash into treasures. Hopefully I'll spark some new creative thoughts and if that happens I hope that you'll share your discoveries and together we’ll build a blog that will singlehandedly reduce global warming and save the world! Okay, maybe that’s a grand goal but we should be able to at least downsize our own trash output.

Recycled License Plates

Last weekend a friend and I drove to a nearby island to do a walking workout (aka – window shopping). While strolling down Main Street I saw these guitars in the window of a gift shop and stopped to take a couple photos.

Aren’t they beautiful? This got me to thinking what else could be done with old license plates. Apparently there are quite a few eco-artists out there using license plates as their media of choice.

liberty flag American Icons Created Out of Recycled License Plates

Aaron Foster

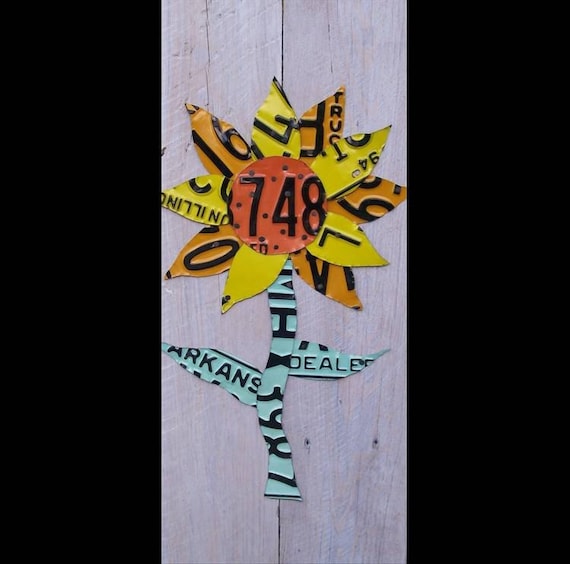
License Plate Art - Sunny Sunflower - Recycled Art Company - Salvaged Wood - Upcycled Artwork

Recycled Art Co

Stress The Seams

License Plate Woody with Surfboard Canvas Reproduction

Rosenberry Rooms

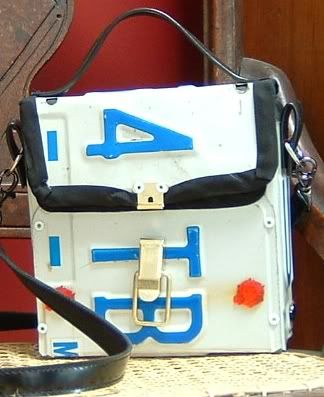
Or how about a purse made out of license plates?

Recycled Purse

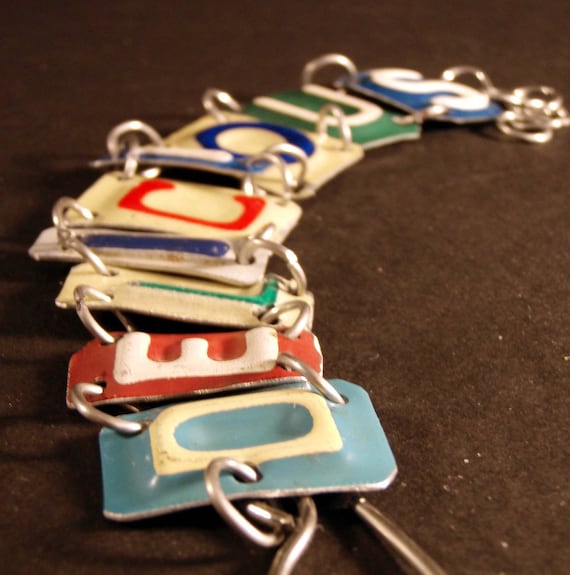
Or a bracelet?

Delicious Pieced License Plate Bracelet

Stress The Seams

So would you like to know how to make a license plate purse?  Craftster has the tute for how to create the license plate purse below.

Happy crafting!


Rebecca of Sunnybrook Farm Gets A Grown Up Makeover

Once again I forgot to take the before pic. This is a similar dress with wider straps.


A friend gave me this little sundress because it had a light blue stain at the bottom of the skirt. She thought I’d slash off the skirt and make it into a cute top, but I had other ideas for this sundress that I didn’t tell her reminded me of something Rebecca of Sunnybrook Farm would wear. It had worked for her with her straight blonde hair, but me with my red curls would look like I’d just stepped off the farm.

I had a pair of little boys swim trunks that was covered with black velvet leaves and flowers. This was the choice for a little boys swim trunks? Go figure! That’s probably why I was able to pick them up for .25 at a garage sale. The little boy they were intended for probably refused to wear them, as any little boy would.

I bought them knowing that I would use the leaves and flowers on something so I had already started cutting them out and had a large pile of them by the time I was given this sundress. I popped the sundress on my dress form and started playing around with the velvet foliage.

My first thought was to use the velvet foliage to create a cap sleeve, but the velvet was too stiff to fall how I wanted it to. So I removed the flowers and covered the entire bodice area. But I didn’t like that either. In the end I decided to cover half of the bodice and wrap the foliage around the back of the dress to just peek out in front at the waist. Oh and I removed the little tie that formed a bow in the back. My theory is that once you can wear heels without falling over you’re too old to wear a dress with a bow in the back. I wanted to make this a zero-waste refashion so I used the ties to make straps for the top of the dress and snipped off a bit from the end of one tie to cover the blue stain at the bottom of the dress.

new bodice

sweet little tie-back - gotta go

tie-back becomes new straps

After securing the new straps to the bodice I cut away the excess and unpicked this length of strap so that it was essentially a piece of bias tape. I needed this to cover the blue stain at the bottom of the dress.

hand stitched stain cover up

A quick bit of stitching to cover the blue stain and my new sundress is ready to wear.

Ooops! Stitched the front of the dress to the back of the dress while hand-sewing my patch.


Some quick action with a seam ripper and my dress is now ready to wear.

Check out lower left of dress - no more blue stain!


Drab Olive Green T-Shirt Blooms

Apparently I like olive green, because I seem to have a lot of tops in this color. After awhile it gets boring though so I thought I’d apply my generally not-so-green thumb to this t-shirt to see if I could get it to blossom into something a little more interesting. Had enough of the bad puns? Me too. Let’s get sewing.

Once again I jumped right in, forgetting to take a before picture. I searched the Internet trying to find a pic of the Kimchi Blue top but couldn’t find one so you’re just going to have to trust me that it was pretty blah before I started.

I have a box of embroidery pieces in my refashion stash which I dumped out onto my top and started playing around with until I had what I wanted. The backs of these flowers are sticky which makes it easy to play with the positioning. Tip: if you have embroidery pieces that you want to play around with before sewing them on you can use a fabric glue stick on the back of the embroidery.

Once I had everything in place I tried using my sewing machine to sew them on but that was just a big mess. I unpicked my botched sewing job, repositioned the flowers and sat down to a good movie with a needle and thread.  A couple of hours later I had my new t-shirt ready to wear.

close up

I actually like that the background for these flowers is so drab. It makes the flowers pop. You can’t tell from this picture but there are way more flowers on one side of the bodice than the other. Symmetrical looked too cutesy. However this t-shirt isn’t done yet.

one last detail

I had this little rose-shaped button which I stitched on to cover the end of a vine that ended awkwardly. I love how fixing a problem often gives you a better result than your original plan.

After trying it on I realized I needed to do a couple more things to make it more wearable.

1) The neckline is pretty low. I’ve been wearing cami’s under it but I think it’s time this t-shirt was able to stand on it’s own. I searched through my scrap stash and found some pink fabric which I could make into a dickey. I really do not like that word. And technically it’s not a dickey that I made but an insert. So insert it is.

finished top with insert worn full length


2) This t-shirt is very long, almost a tunic and I don’t always want to wear it that long so I threaded a silk cord through the bottom hem which I can use to gather the bottom of the t-shirt to make it as short or as long as I want.


worn short

If you take anything away from this refashion I hope it’s that with the insertion of a bodice piece you can make a top more modest and by threading a ribbon through the existing hem casing you can make a top adjustable. Enjoy!